Mailing Lists allow you to subscribe clients to various correspondence lists. Each type of mail-out you create should have a Mailing List. A mailing list allows you to subscribe and unsubscribe your clients from the lists.
You have a number of methods and attributes for each mailing list. This article shows you how to set up Mailing Lists available for your client.
To launch the Mailing List setup go to Setup > Mailings > Mailing Lists
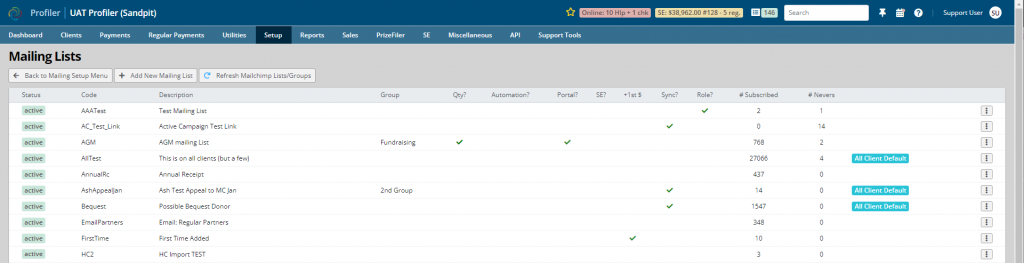
You will be presented with a list of your existing mail lists (if any). On screen you can see if they belong to a Mailing Group, if they display a Qty, if there is any Automation on adding or removing the clients, if they can be managed in the client Portal, if they are shown as a subscription option on the Special Events screens, if they are added on +1st Payment, if it is Sync’d to an external provider (like mailchimp), and how many clients are Subscribed to the list and those sent as Never send.
To create a new mailing list click Add New Mailing List or to edit an existing list use the “…” menu for the mailing list you wish to edit.
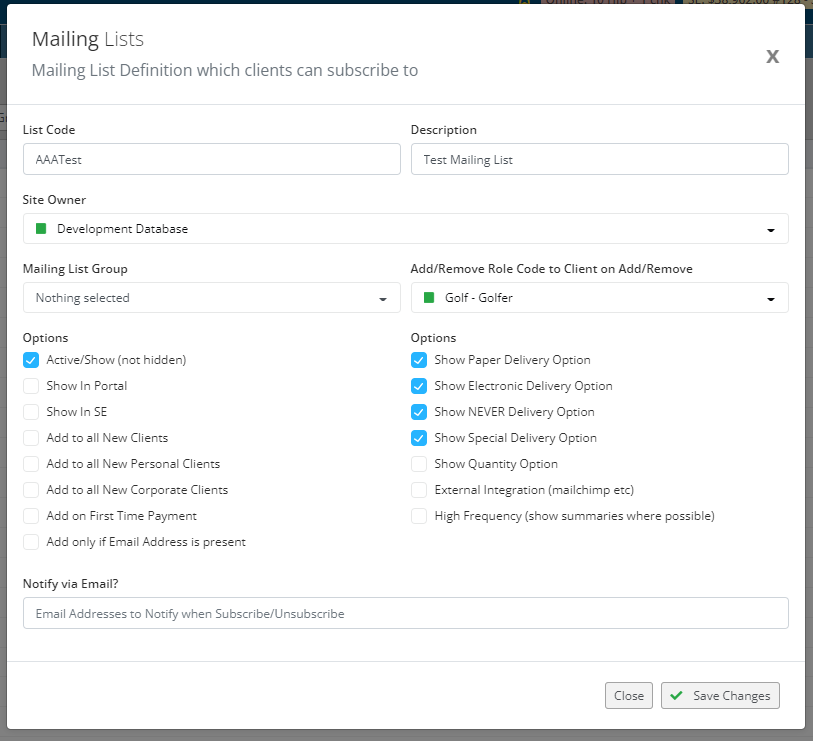
When adding or editing a mailing list we have a number of options available.
- List Code – this is a short code you make for the newsletter to show in abbreviated situations
- Description – give this a nice description for your mailing list
- Site Owner – if there is multiple sites/locations, you can set this mailing list to be owned by a particular site
- Mailing List Group – this allows you to group the mailing list(s) into particular groups. You can set up groups in Setup > Mailing > Mailing Lists Groups – a common example might be “Fundraising” or “General”
- Add/Remove Role Code to Client on Add/Remove – this allows you to automatically add or remove a role code to a client based upon adding or removing the mailing list to the client
When then have a number of options when creating the Mailing List subscription options which you can select multiple options
- Active/Show – allows the mailing list to be added to clients
- Show in Portal – shows the option for subscribing or unsubscribing the client in the Client Portal system (if your site uses that function)
- Show in SE – shows the option for subscribing the client to the Mailing List in the Special Event kiosk screen
- Add to all New Clients – when selected – will add this mailing list by default to all clients as they are added as new clients to Profiler
- Add to all New Personal Clients – when selected – this will add this mailing list by default to all Personal (non corporate/business) clients when they are added as new clients to Profiler
- Add to all New Corporate Clients – when selected – this will add this mailing list by default to all Corporate (non Personal) clients when they are added as new clients to Profiler
- Add on First Time Payment – the mailing list will be added to a client once they make their first payment to your organisation
- Add only if Email Address is Present – will only add this mailing list to a client if the client has an email address set
- Show xxx Delivery Option – this will allow when adding the mailing list to a client on the delivery method that is available for selection. For example, for Email Mailing Lists, you probably only want to show Email and Never options
- Show Quantity Option – allows you to set a quantity option when subscribing a client to the mailing list – useful for magazine subscription options
- External Integration – when selected allows you to select the external email system and list that you wish to sync this mailing list with (ie. Mailchimp List). We have further information about the external integration sync here
- High Frequency – when selected, it’s designed for mailings that are sent out daily. It will show a summary of the Mail Sent on the Client > Mail Sent screen rather than each individual mailing that has been sent.
You also have an option for email notification as clients are added or removed from the mailing list – we have a separate article about that setup available here.
Once your mailing list is set up click Save Changes and the mailing list will be available for selection. If you wish to add existing clients en-mass to this mailing list, you can read the information to bulk add clients to mailing list here