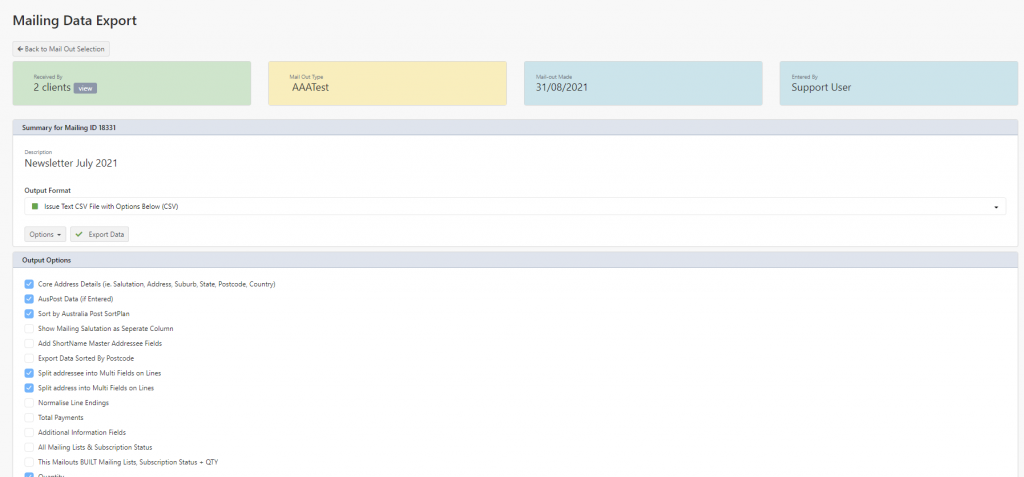
After creating a mailing/mailout you can export this data as a CSV file for use in a Microsoft Mail Merge or for sending to an external provider for sending off the mail-out.
From Reports > Export Mail-Out select the Mailing that you have previously created.

You will see your recent mail-outs in the drop-down list. If any show with a grey metal “cog” icon – this means it is a “system” mail-out (Receipt etc). You can also filter the list of recent mail-outs by the drop-down.
After selecting the mailing, click Load Mail Out

A summary will be shown of the mailing. At the top of the screen you can see key information about the mail-out. For export to Microsoft Word or a Mail House you need to set the Output Format to Issue Text CSV File
There is a number of options that can include extra fields inside the CSV data file, for most situations the default settings are enough, the options are:
- Core Address Details – enabled by default, and include all the name, address, addressee information for each client receiving the mail out.
- AusPost Data – if your site is using and has Australia Post barcode data, this will be included in 2 extra columns on the CSV file
- Show Mailing Salutation as Separate Column – if you have a specific salutation that the client has set for a particular mailing list, this will be shown in this extra column (as set on each client under their Client > Mailing List screen)
- Add ShortName Master Addressee Fields – if you are using ShortNames to group clients to the same house, the Master Shortname address information will be included in extra columns in the CSV file
- Export Data Sorted By Postcode – will sort the data inside the CSV file by postcode rather than Client ID (default)
- Split addressee into Multi Fields on Lines – If enabled, and there is multiple lines for client Addressee fields, the Addressee Field will be split into multiple columns (Addressee Line 1, Addressee Line 2), rather than all being in 1 column with a line feed to separate each line
- Split address into Multi Fields on Lines – as per above, but with the address field
- Normalise Line Endings – if you have problems in the file with each row, you can use this option to force a stricter creation of the CSV data file
- Total Payments – adds a column to the CSV file showing the total $ of payments a client has made in total (LTV)
- Additional Information Fields – this will include any fields added as extra on the Client > Additional Information tab
- All Mailing Lists & Subscription Status – this will include a column for each Mailing List in Profiler, and in each column, for each client if they are subscribed to that mailing list, and the method of delivery (Post, Electronic, Never etc)
- This Mailouts BUILT Mailing Lists, Subscription Status + QTY – this will include 3 extra columns – 1 identifying the mailing list that built the mailout, the clients subscription preference (Paper, No Restriction, Never etc), and Quantity – which if enabled will show how many Qty are required for that client (as set under Client > Mailing List)
- Quantity – if enabled, and the Mailing List has Quantity enabled, it will include the quantity value set for each client (as set under Client > Mailing List)
- Show 1 field with all enabled Mailing Lists for the client – will create an extra column, showing a comma separated list for each client, listing all the mailing lists the client is subscribed to
- Highest Gift $ Amount Between – if enabled, will show an extra field, that shows the highest gift the client has given, between the 2 values you have specified when ticking that box.
After selecting the options required for the CSV file, you can click Export Data and a CSV file will be downloaded to your computer with the fields selected and the clients from that Mail Out.
