Profiler 9.2 launches the new Email Campaign system under Reports > Email Campaigns. This screen allows for the building of email campaigns and viewing the success of previous email campaigns.
Creating a New Email Campaign

Upon launching, choose Create a New Email Campaign and click Continue
The next section is broken up into 4 parts which need to be filled.
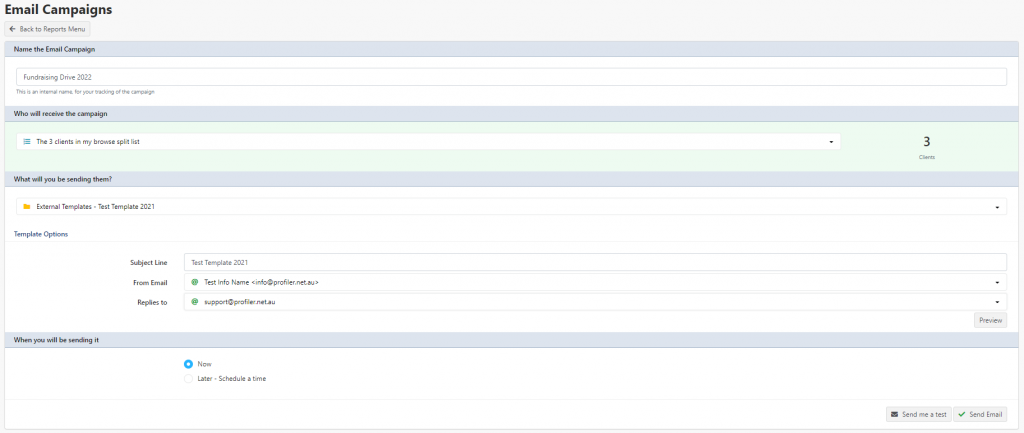
Name the Email Campaign
In this section give the description of the email campaign. It’s not displayed to the clients, only displayed in the Client > Mail Sent tab, allowing you to give a description on what this email campaign was about/purpose
Who will receive the campaign
This section allows you to select who is to receive this email campaign. There is a number of options available here, some will not be displayed, depending on what data is available.
- Browse List – the clients who are currently on your browse list
- Split Browse List – the clients who are currently on your split browse list
- Dynamic List xxxx – all the clients who are in the selected dynamic list
- Static Browse List xxxx – all the clients who are saved in the selected static saved browse list
- Mailing XXXX – people who received specific mail out XXXX (only shown, when launching Email Campaigns from the Reports > Export Data screen)
- All Clients who are in Mailing List xxxx – all the clients who are in the Mailing List xxxx
After selecting the list you wish to use, you will notice to the right, the number of clients in the selected list that will be mailed.
What you will be sending them?
This is where you can select the template you wish to send to the clients. These templates are set in the Setup > Templates > Email Templates and Import/External templates sections. If you have Mandrill integration, these templates will also appear here. You can read about importing templates from other systems here.
You can also select the option to Compose Using the Email Editor (next screen) which will allow you to continue onwards but use the email system to compose (or select a template) from within Profiler. (using the normal email system)
If applicable – once you have selected a template you can set the email properties of Subject Line, From Address and Reply Address. If you wish to add more email addresses you can read about that here
When will you be sending it?
This allows you to select Now or choose Later and pick a date and time that the email will be sent.
Testing and Ready to Send?
Using the Compose Using the Email Editor option
This process will be sightly different if you are using the Compose Using the Email Editor function as the testing takes place using the normal email system. You can choose the Send Email option and follow through the prompts, and the normal email composer will appear (allowing you to send a test email)
If you are using a template (not the Compose Using the Email Editor)
When you have set all the 4 sections, you will notice an option to Send Me A Test at the base of the screen. When you click this button, a field appears just below with the email address you wish to send a test to, enter the email you wish to test it with and click Send Test Email.
Profiler will then immediately send the email to the entered address.
When you are happy with the email result (on the test), on the same screen, click Send Email
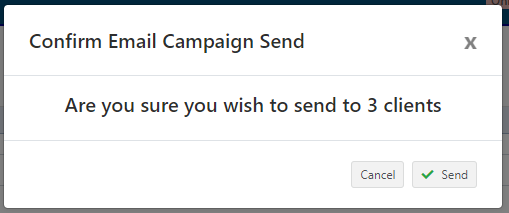
You will be prompted to confirm you are ready to send. If you are click Send and Profiler will queue the email for delivery.
The campaign will show up against each client under their Mail Sent tab.
Viewing a Email Campaign Success
From the Reports > Email Campaigns screen, you can select the View an Existing Campaign Stats option and click Continue

On the following screen you can select the previous Email Campaign that has been sent.

After selecting the Campaign required – click Load Summary
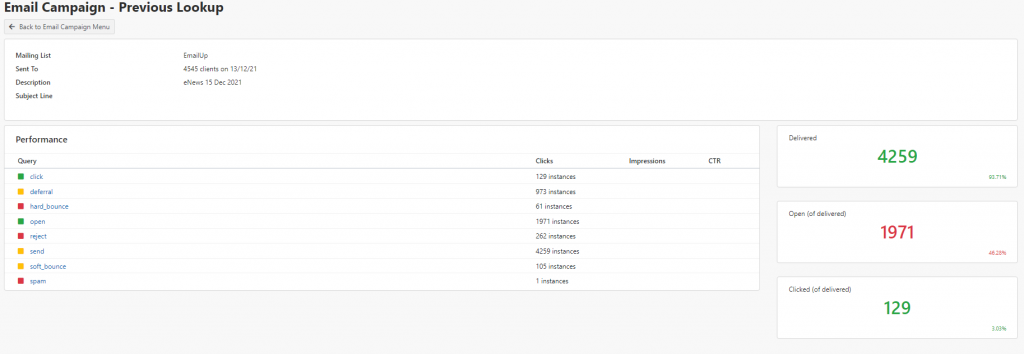
As data appears from your clients it will appear in this screen, showing how many have received, delivered, clicked, bounced and opened. This data is constantly fed from your clients as they open the campaign.
You can click on each of the statuses to drill down to find specific clients who are attributed to the status.