Profiler supports integration with 3rd party crowd fundraising platform RAISELY. You can use a Raisely page for your fundraising and you can set up Profiler to receive successful payments from this platform to be ingested into Profiler RAPID. This document outlines the tasks needed in both systems to set up this link.
In Profiler
We need to tell Raisely where to put certain key pieces of data. If some of these fields are already set up, you don’t need to set them up. Go to Setup > Integration > User Defined Fields
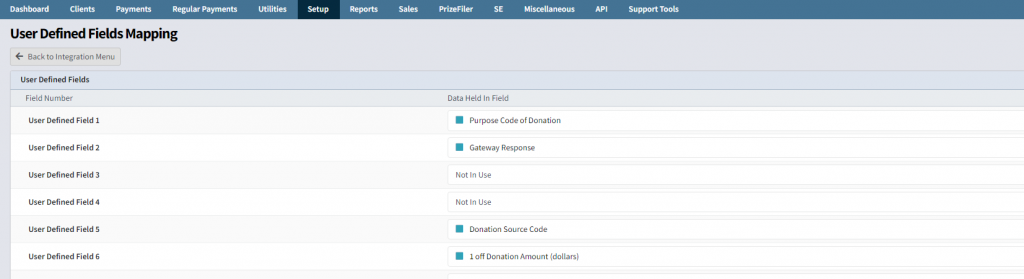
Your screen will look similar to above, however your user defined fields may (likely) be in different positions, and this is okay.
Ensure a User Defined Field is allocated to
- Purpose Code of Donation – this will hold the name of the person/organisation the payment came from from Raisely.
- Gateway Response – this will hold the transaction number from Stripe (to tell Profiler the payment was successful)
- Donation Source Code – while this won’t be fed from Raisely, it allows you to set the source code for the payment (details further below)
- Client IP Address – this stores the IP address of the person making the donation.
Once you have made these fields assigned to Profiler, you are ready to accept Raisely payments. For each “Purpose” – Profiler will create a Purpose if it has not been created yet. It will also bring across the goal for that purpose.
As Raisely has no concepts about “Source Codes” you will want to define the source code for payments coming in. You can do this in Setup > Integration > General Integration Settings
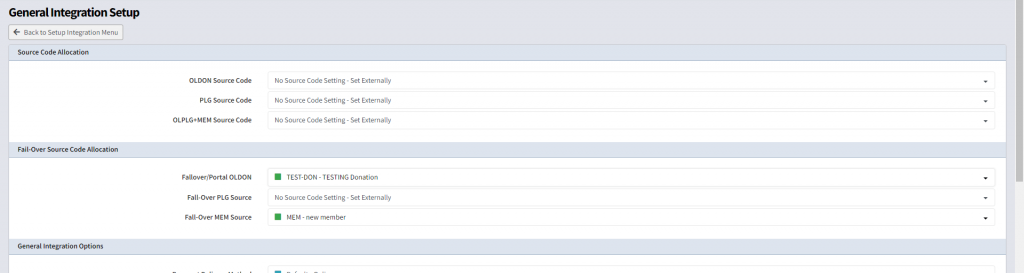
These 2 top sections of the page define the source codes of your payments coming in from your website. The top section is the main section. You may already have a website linked into your Profiler system. The OLDON (Online Donations) line defines the payment source code for payments coming in from the website.
Often this is set as No Source Code Setting – Set Externally – which means the website form is defining the source code for payments. If you set a source code here all payments from the website AND Raisely will have this source code.
However, if you leave the top OLDON Source Code line as the No Source Code Setting – Set Externally this will allow your websites to continue as they normally do, you can set the Failover/Portal OLDON value (example above is TEST-DON), which means all payments coming in from Raisely will take this source code.
Make the changes and click Save Changes. You are now ready to configure Raisely.
In Raisely
In your Raisely admin centre we need to add Webhooks. Go to the settings of your Raisely into API & Webhooks and on the right hand side (screenshot below) we want to add a webhook.
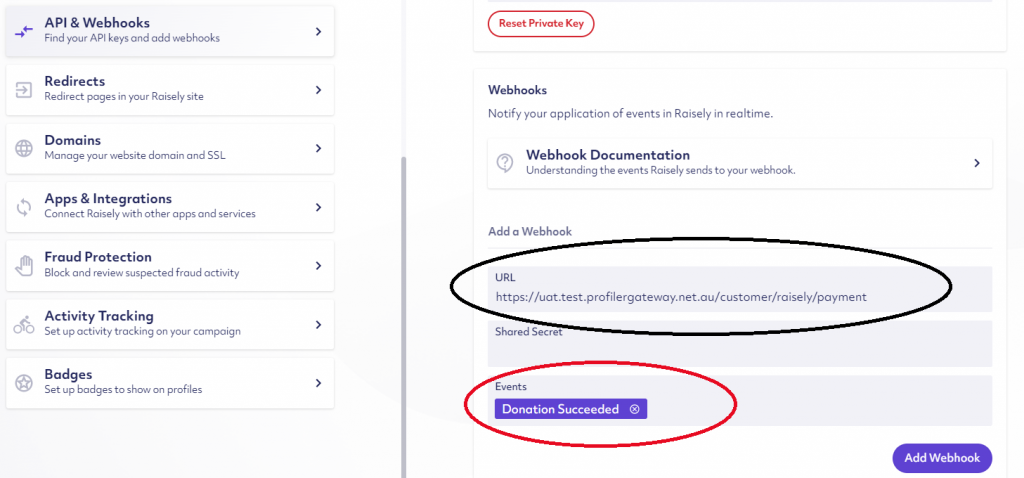
The Event is Donation Succeed – this means data will be pushed to Profiler on a successful donation – which is what we want.
The URL is unique to you – if you access profiler normally (from the URL) as “mycompany.profilersystem.com” – we use the first part of the URL to make the URL below.
so for example “MyCompany” login would be https://mycompany.profilersoftware.com/api/webhooks/raisely/payment
The bit in red changes – that’s the first part of the URL from the normal profiler login screen – this determines how Raisely gets the data to your Profiler system.
For subscriptions the event will be Subscription Updated and the URL for subscriptions will be https://mycompany.profilersoftware.com/api/webhooks/raisely/subscription
Once you have put in the URL for your Raisely campaign – Save the option in Raisely and you will now be ready for Profiler and Raisely to be integrated.