Profiler supports a membership renewal portal that can allow your users to log in to the Portal (or click a specific merge field in emails) to link directly to their portal inside Profiler Portal to allow them to update their details (optional) and create (or renew) their memberships/subscriptions.
This document outlines the setup process for this function.
Profiler Portal Setup
From Setup > Generic Parameters > Portal Setup
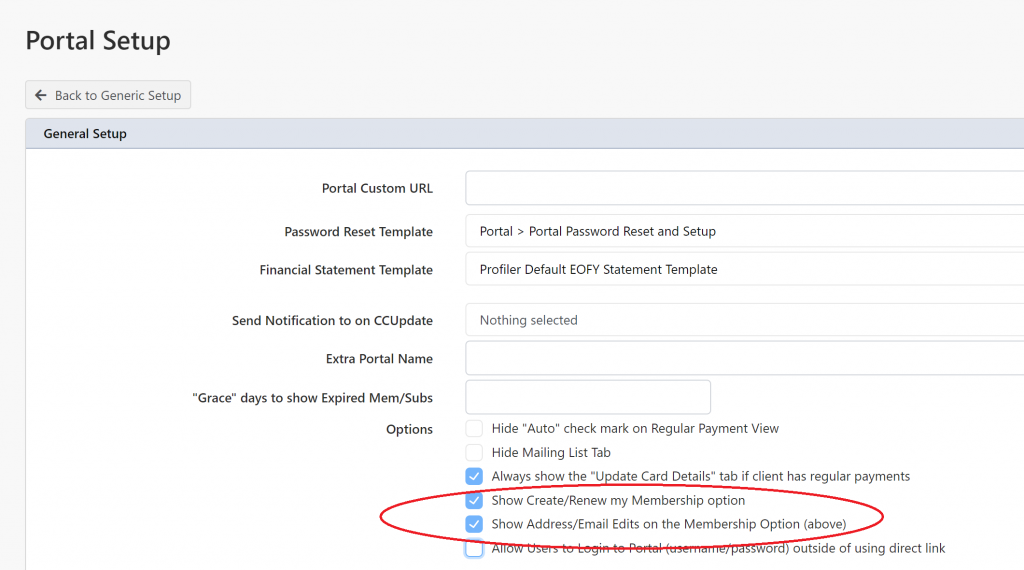
The two options in the screenshot above relate the the Membership Portal
- Show Create/Renew my Membership option – will enable the “Membership” menu tab on the client portal. If the client has no existing memberships/subscriptions, the only option will be to create a new membership
- Show Address/Email Edits on the Membership Option (above) – when ticked, this will also include the fields at the top of the Membership tab in the Portal for the client to update their address, email, phone number etc as part of the process
Once you have enabled the required options, scroll to the bottom and click Save Changes. If you wish clients to pay for their memberships online, you need to set the source code the portal will use for these payments
From Setup > Integration > General Integration Settings you need to set the Fail Over MEM Source source code. (screenshot below)

And then scroll to the base of the screen and choose Save Changes
Manually Locating a Clients Portal URL
If you wish to send (or try) a client’s portal (as they would see), you can go to the Client > Portal tab and in the Portal Access – the URL will be located next to Membership Update URL.
To include the URL in email correspondence with clients – you can use the [portal_link_mem] merge field – as described here
Portal Viewing
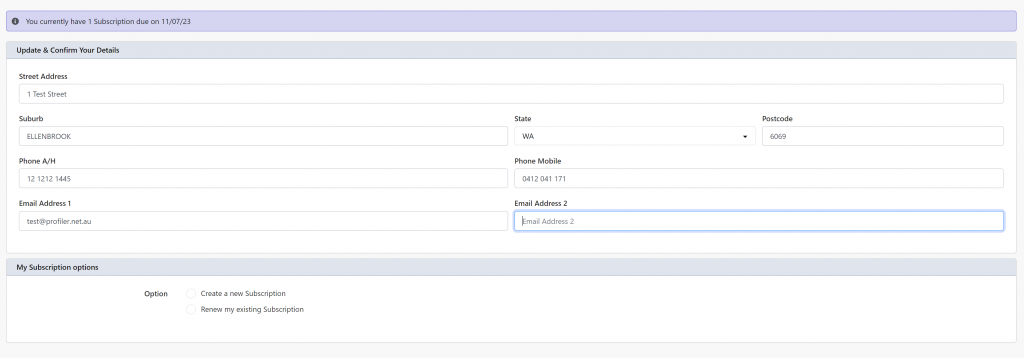
If you are showing the Address Update option the portal screen will look like
When not using the Address Update option the screen will look like

Regardless of the mode, the subscription/membership section will work the same. The only difference is that when saving, and the address fields are showing, these will also be updated.
Subscription/Membership Options
If the client has an existing membership (or one recently expired – as set by the value in Setup > Generic Parameters > Portal Setup and the “Grace” days to show Expired Mem/Subs) you will see the option to Renew an Existing Subscription/Membership, and the option to Create a New Subscription/Membership
When choosing to Renew

Profiler will allow the user to select the subscription they wish to renew (if they have more than one) from the dropdown. The most recent/active subscription will be selected by default (and be correct for most clients)
If creating a new subscription or renewing an existing, the rest of the screen from now on, will be the same
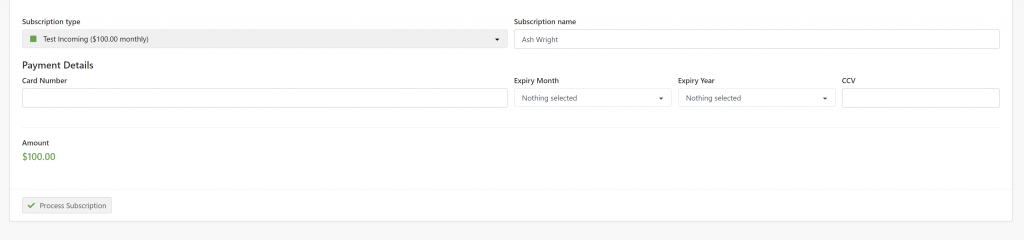
The Subscription Type can be selected – you can create new selectable subscription types at Setup > Integration > Membership Type Mapping – and that is discussed further here
The Subscription Name will default to the client name (and will be used as the receipt name). Then the option for Card Number, Expiry Month, Expiry Year and optionally CCV (if your payment gateway requires it)
The summary of Amount will be shown and then option to Process Subscription will be displayed. If the payment is successful the screen will refresh and the payment will be saved, the subscription/membership will be either created or renewed, and the due date rolled over to the next period.
An unsuccessful payment will show the reason for failure and allow the user to re-enter their selected payment method.